Deploying frontend applications — the fun way
How I deploy my frontend applications using GitHub, Jenkins, Docker and Digital Ocean
In this post I will show you how I deploy my frontend applications using GitHub, Jenkins, Docker and Digital Ocean. I had some doubts through my learning journey so I decided to put up what I learned on this post as a self note.
Note: This post is not intended for you my friend, expert and consultant guru 15+ years exp DevOps architect; this is for those of us who are just starting to discover the beauty of CI/CD tech. This post may contain some bad practices, please take it with a grain of salt.
Cut the crap, shoot me the TL;DR
You’re like me, you skim around and grab the bullets, you leave. Here’s the TL;DR for you:
- Spin up 2 servers with Docker installed: build and production servers
- Install Jenkins (or any other CI) in your build server
- Create a job in your CI that clones, installs and builds your project in a docker image
- Set up webhooks in GitHub to fire the job on every push
- Push the docker image to your personal Docker Hub
- SSH into your production server
- Pull the image from Docker Hub and run the container
- Profit
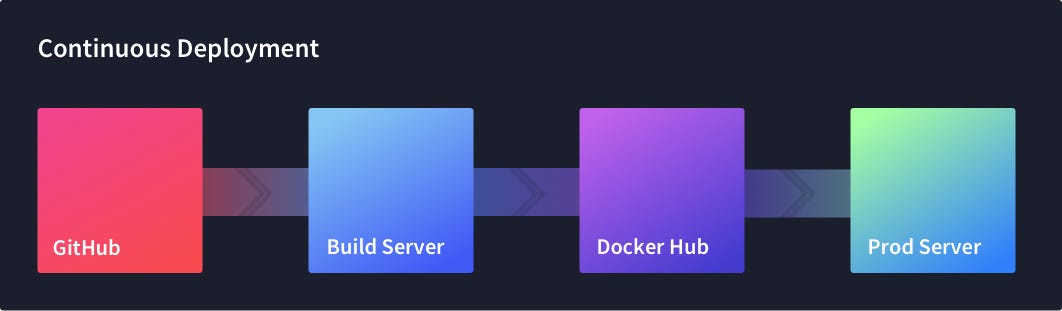 Docker based continuous deployment workflow
Thanks for reading.
Hopefully I caught your attention and you want more details now. In the following paragraphs I will outline my thought process and explain how my deployment pipeline works. I won’t go deep into technical details but will instead put up some useful links for your further research.
The problem
Simple: I developed a TypeScript AST interactive viewer in Angular and I wanted to deploy it.
 TypeScript AST Interactive Viewer
*Bu… but, why not use Firebase, Google Engine, vanilla FTP, GH pages? you know, like “one-click deploys” duh —*you may ask. All those tools work great, but most of them are either too expensive or just felt too magical (nothing tops “gcloud app deploy”) and are not that fun to learn! I wanted to understand, automate and have full control of the whole deployment process. I wanted a challenge, I wanted to learn, I wanted to have fun (hell I’m inspired).
What it all comes down to
I set up my own challenge which looked like this:
-
I want to push code and have it deployed automatically — aka Continuous Delivery.
-
I want to pay a cheap hosting service
Let’s draw these non-functional requirements in a black box diagram:
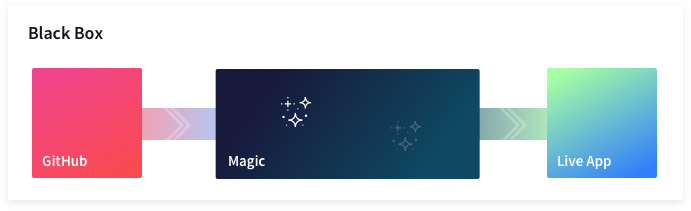 Problem illustration. From GitHub to Live App. Icon: magic by ✦ Shmidt Sergey ✦ from the Noun Project
Unraveling the Magic box
I’ll divide this chapter into three parts. Each part will reveal one small portion of my Magic box:
-
From GitHub to Magic
-
Developing the Magic
-
From Magic to Live App
1. From GitHub to Magic
Push code, sit and relax, refresh live app, profit. That’s all I wanted.
Choosing my VPS (Virtual Private Server)
The first step was then to set up a server which could grab my code from GitHub and execute a series of commands (npm i && npm run build). Not quite sure what to do next, but I knew I had to start from there.
After reading about the best VPS providers out there, I finally went with Digital Ocean. Great tutorials, easy for new comers, decent DNS management and good pricing — was a no-brainer.
CI tools everywhere
After signing up, I knew I needed some sort of tool that let me grab the code and automate the build process — the CI tool (Continuous Integration). There are several of them out there, some of them targeted for open source projects, some primarily designed to be self hosted, some premium, some free. I chose Jenkins mainly for its concept of Pipelines and because I had some familiarity with the tool.
Reading through some tutorials, it was relatively easy to get my Jenkins instance up and running. Now I needed to tell Jenkins to grab my code whenever I git pushed. Turns out there are dozens of posts out there on how to set up a GitHub webhook pointing from your repo to your Jenkins Droplet IP. Setting this up was faster than I expected (not quite straightforward for private GitHub repos, though).
Let’s recap
At this point I have a DO droplet running Linux with a Jenkins instance pulling code from GitHub on every git push. How cool, huh? Let’s see how our Magic box starts to reveal itself:
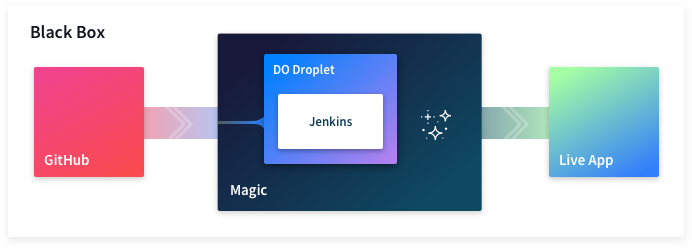 Black box diagram with Digital Ocean Droplet and Jenkins
Useful links:
2. Developing the magic
In the next few paragraphs, I’ll develop the core of my strategy which leverage Docker and DO droplets. Let’s dive right in.
Dockerize all the things
At this point, I have a dist folder with an index.html and its dependencies, ready to go. I know I need to spin up a webserver to serve these files over the web. Let’s then install nginx (or Apache) in the same server and serve the thing. I also need to install Node and a couple global node packages. Easy peasy, let’s do that…
“But wait, Carlos, that hmmm… that doesn’t feel like the right thing to do — you’d end up with a ton of stuff installed on your server and managing your dependencies will be a hell later on… just saying, though” — Inner self
Indeed, I needed a way to encapsulate the dependencies, the dist artifact and even the webserver so that it wouldn’t mess up my server. Let’s use Docker. It would let me build an image with my webserver running on a port on my server, and my server filesystem would barely notice what I just did. How cool, huh?
I set up a Dockerfile for my app and edited the job in Jenkins to build a docker image and run the container with the 80 port exposed. It worked like charm. I could access my app live from http://my.server.ip.
On scaling and stuff
I planned to have many applications deployed with this same schema using the same server. It wouldn’t make sense then to run Jenkins and all my containers in the same server. It just felt like I could do much better — I wanted to separate concerns. Sure I can juggle with different users, having Jenkins living in its own user, etc, but something within me really wanted to keep a machine specifically for building my applications.
Based on this premise, I created another droplet (aka server) with less memory (no heavy lifting, just to serve webapps) and with Docker installed as it should be able to run Docker containers. I would then run all my apps in this server. This would let me scale well because I could easily change the memory allocation on my build server, while leaving my apps untouched.
Let’s recap
We’ve made quite a good progress. We’ve settled for Docker as our core build mechanism and we also decided to separate concerns in favor of maintainability by spinning up a separate production server in another server.
 Deployment workflow with Docker and 2 DO droplets
Useful links
3. From Magic to Live App
I wasn’t sure how to integrate my servers (build + prod). After asking for help and researching, I came to the conclusion that, for my particular use case, I could implement the following workflow:
-
Build the docker image in the Build Server
-
Push the docker image to my Docker Hub
-
Log in to my prod server via SSH
-
Pull the image from the Docker Hub and run the container
It made sense as I didn’t have to resort to using tools like docker-machine or kubernetes to orchestrate my servers. It just works, it’s simple and it looks clean enough for me.
Note on security: It’s recommended to disable password based authentication on your production server and enable only key based authentication from your build server. That is, it will be virtually impossible to login to your prod server if not from your build server.
Show me some code
A technical post is not a technical post until you show some code. Let’s see what the Jenkins pipeline looks like in the CI when integrating the whole thing:
#!/usr/bin/env groovy

node {
  def app

  stage("Clone") {
    git 'https://github.com/caroso1222/ast-viewer.git'
  }

  stage("Build") {
    app = docker.build("caroso1222/ts-ast-viewer")
  }

  stage("Push") {
    docker.withRegistry("https://registry.hub.docker.com", "docker-hub-credentials") {
      app.push("${env.BUILD_ID}")
      app.push("latest")
    }
  }

  stage("Deploy") {
    sh "ssh root@my.server.ip \"docker stop ast_0 && \
        docker rm ast_0 && \
        docker pull caroso1222/ts-ast-viewer:latest && \
        docker run -d --name=ast_0 -p 8080:80 caroso1222/ts-ast-viewer:latest\""
  }
}
I’ve labeled some lines in the snippet, let’s go through them real quick:
-
Build docker image based on the Dockerfile.
-
Push the docker image to my Docker Hub account.
-
SSH into the production server
-
Pull the image from my Docker Hub*.*
-
Run the container from the image we just pulled. I run the container on port 8080, but that’s because I set up nginx to route the traffic to several containers in the same server via subdomain proxy_pass (e.g. domainA.com serves container A, domainB.com serves container B). I won’t elaborate on this technique as it falls out of the scope of this post.
As stated at the beginning of this post, this pipeline runs on every git push made in master. The following image shows what happens on Jenkins for every deployment. By the way, I love this image as it depicts what the challenge looked like in my head before diving in.
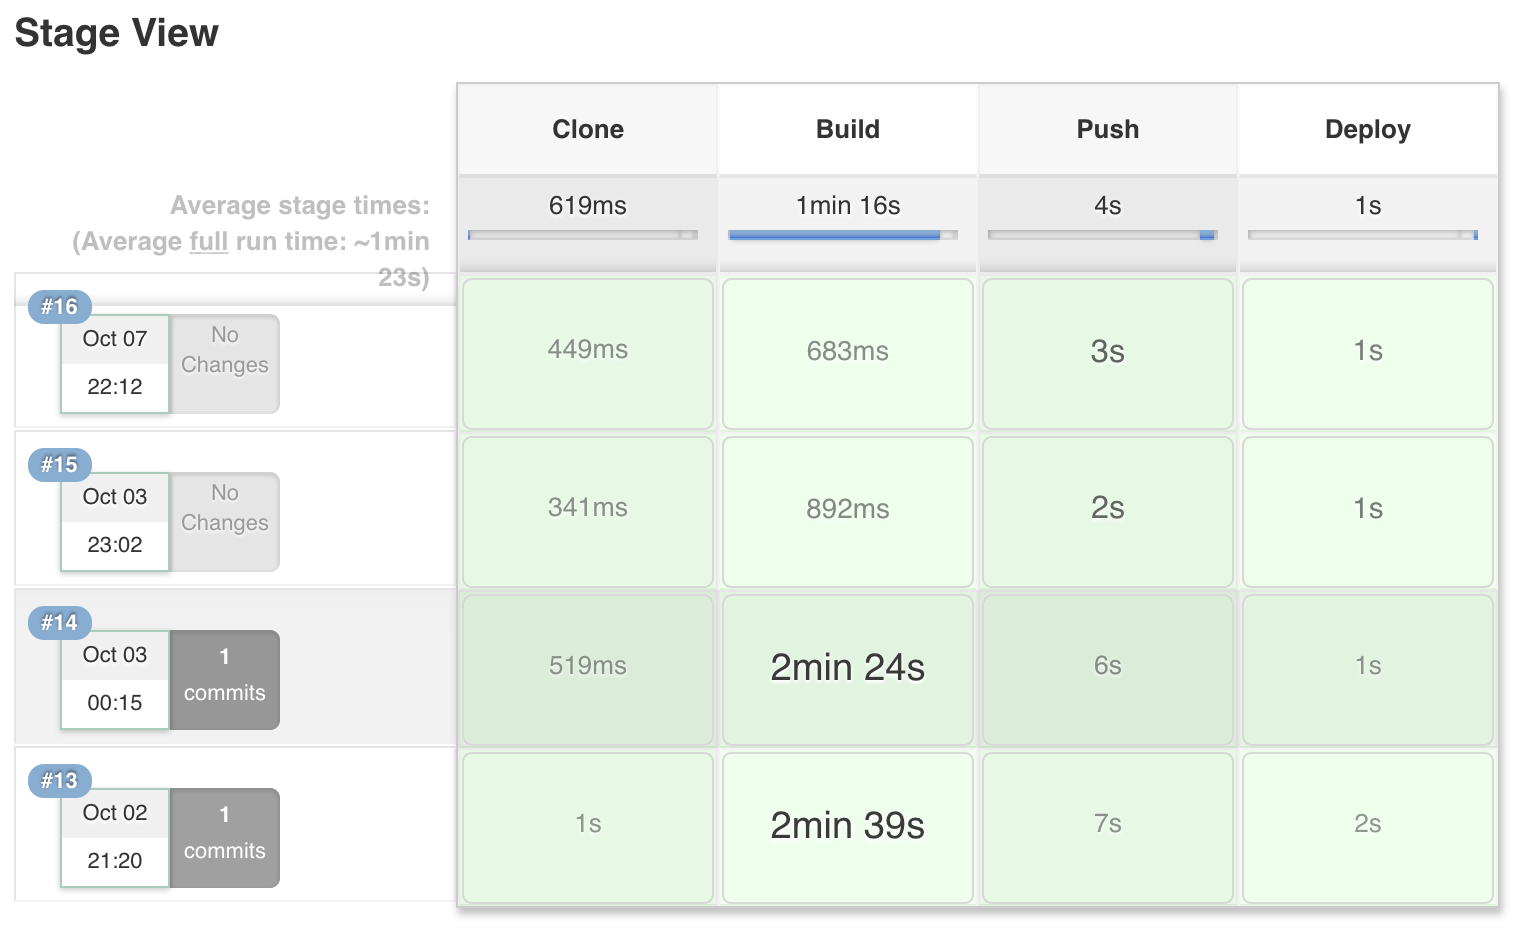 Stage view of the Jenkins pipeline. Each line represents a deployment triggered by a git push.
Let’s wrap up
We finally made it. We have unraveled our black box. Every secret has been revealed and we have been able to cover each one of its components. Let’s take a look at what our final deployment workflow looks like now!
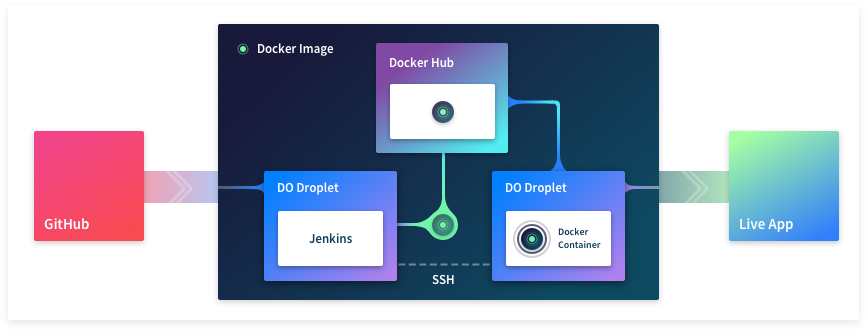 Diagram of the full deployment strategy covered in this post. A Docker image is built in the build server, goes through the Docker Hub and finally made it to the production server.
Useful links
Conclusion
There are tons of deployment strategies out there, each of them with its pros and cons, and each one relying on a different stack with its own taste. That’s the beauty of it. In this post I covered just one of these strategies that grants me full control over my custom deployment pipeline using two servers, a CI and Docker.
It all might sound daunting if you’re not very familiar with the concepts we covered. Fear not, I say. It’s a long post mainly because it sums up a learning journey which spanned across almost 3 months, putting 1–2 hours each night grinding on these servers and reading stuff I was not very familiar with.
Even if you’re a FrontEnd developer focused on browser-land, I still think it’s very valuable that you get familiar with the full stack. It will give you the tools to have a solid conversation and form an opinion when discussing DevOps stuff in your company. It’s better to say *“you guys are the experts, but this is my opinion on the matter…” *than saying “well, that’s not my thing, you ops guys figure it out”.
I hope you got some inspiration to go ahead and implement your personal deployment pipeline and get to know all this DevOps tech — tons of fun ahead!
Shameless self promotion
I’m not an amateur SoundCloud rapper nor I’m looking for funds in Patreon. I just want you to check out my other posts like this one or this one, maybe you can grab one or two things that you like.
Find me on twitter @caroso1222 and don’t forget to say hi!

I'm Carlos Roso. I'm a Production Engineer at Meta. Former SDE at Amazon. Ex digital nomad at Toptal and Crossover. In love with open source and design.
More about me